The FreeBSD Diary |
| (TM) | Providing practical examples since 1998If you buy from Amazon USA, please support us by using this link. |
|
Implementing Hardware RAID on FreeBSD
9 December 2004
|
|
RAID has been around for over 15 years. Why use RAID? For me, the reasons are redundancy and reliability. I don't like disk failures. By running RAID, a disk failure will not take down my system. It still runs after a disk fails. When a disk does fail, I still have my system, and I can get another drive, add it to the system, and be ready for the next failure. Hardware fails. Disks fail. It is better to design the system around expected failure than it is to buy better disks. I have two 3Ware 7006-2 and an Adaptec 2400A. One of the 3Ware cards is running the Windows XP system which I'm using as I type this article1. The other is in polo, my main FreeBSD box. My goal is to add the Adaptec 2400A to polo, create a RAID-5 array, and migrate the data from the 2x80GB drives to 4x80GB drives. I have written previously about swapping boot disks. In the five years since then, I've learned a great deal more about FreeBSD. In this article, I will use a FreeSBIE CD to boot the system. Then I can copy from the original file system to the new file system. I still do it this way because I know the file system will be unused during this process. An exact duplicate will be obtained. Just before I started this project, I upgraded all the firmware and BIOS on the Adaptec card. 1The article actually resides on my FreeBSD box which hosts my various development environments (e.g. FreeBSD Diary, FreshPorts, BSDCan). I'm typing on my XP box and the FreeBSD box supplies a Samba share. |
|
A bit about FreeSBIE
|
|
I first heard of FreeSBIE in March 2004. It has come to my rescue a number of times. I used it when my laptop HDD died just before a conference. I was able use the laptop when out of town because of FreeSBIE. I take the CD with me when I'm considering hardware for purchase. By booting the FreeSBIE CD, I can get a feel for what will and will not work. FreeSBIE contains a wealth of applications, including: Gimp, XFree86, evolution, gaim, xmms esound, XFce, xcdroast, samba, python, mpg123, Midnight Commander, dvd+rw tools. I think you'll find it's a great little tool to add to your collection. |
|
Installing the hardware
|
|
I will be using four Seagate ST380011A drives. These are 80GB, 7200 rpm, Ultra ATA/100 IDE drives. Yes, IDE. I'm doing RAID on IDE. At one time, that would have been unheard of. It was always SCSI. IDE performance and price have improved dramatically over the past few years. I do not know when the Adaptec 2400A first came out, but the documentation I have is copyright 2001. I'd say things have come a long way. IDE RAID is perfectly feasible for many situations. Investigate. It might suit your needs too. 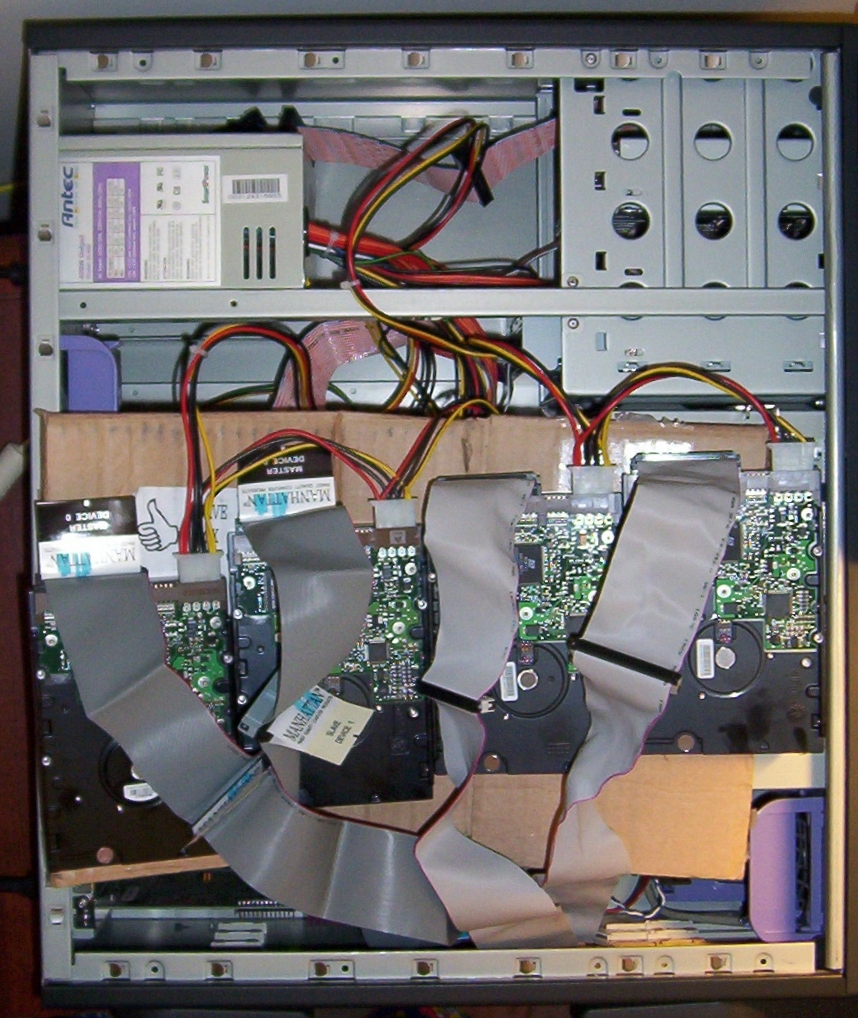
It is not essential, but it is a good idea to have identical drives in your RAID array. All things being equal, you will get better results that way. I bought my drives from OEM Express, my not-so-local store. The card is a full length PCI card. It won't fit into a small case. I would not recommend attempting to connect or disconnect the cables while the card is installed in the computer. I fear the card might break. In my particular situation, I took a risk and set up the disks on a cardboard sheet on the cop of my case. I don't recommend doing this, but it worked for me. You decide what is best for you. |
|
Creating and building the array
|
|
RAID comes in many forms. There are different types of RAID, some allowing mirroring of disks, others allowing for striped disks. Pick the one that suits you best. For most applications, RAID-1 (mirroring) or RAID-5 (striped array with rotating parity) make the most sense. I already use RAID-1 on two machines, and I'm about to introduce RAID-5. The 2400A comes with SMOR (Storage Manager on ROM), a BIOS-based setup utility that enables you to configure your Adaptec RAID controller. In short, you want to create a disk array, then allow it to build. The building process can take many hours. My 4 drives took 4 hours to get to 80% completed (I then left it over night to complete). I had a problem with my controller setup. The controller saw only three of four drives. I suspected the cable. After swapping two cables around, the problem moved with the cable. I was going out anyway, so I bought new IDE cables. The problem persisted. OK, it might be the IDE controller. I feared the connector was the cause. Then master/slave was mentioned to me. DOH! I had removed the jumper when doing some earlier testing with one drive. After replacing the jumper, all four drives were detected. The upside is: I now have four identical drives linked to a controller by four new identical cables. After creating the array, I exited SMOR. The system then rebooted and I was back into FreeBSD, where I found this: There you go. You can even use the Raid Calculator to check the expected size. In my case, I was expecting 240GB. I suspect these drives actually hold only 76GB after formatting. Which makes 228GB, which matches the value shown above. At this point, I could hear disk chatter from the four drives. The RAID array was building. I've heard disk chatter before, but not from four drives simultaneously. It was quite unique. The building took at least 4 hours. By that time, it was only 85% complete. I went to bed and left it to run overnight. The next morning, the disk chatter had vanished. |
|
Got drive?
|
|
It is now the morning after. Now that I have my new drive (and yes, you should think of all four drives as one), what am I going to do with it? Partition it, slice it up, create mount points, and copy. Sounds easy. Sure it is. And it's all documented in the Handbook. I'm also going to do some testing to make sure I know how to rebuild the array before I need to rebuild it.
If you do follow the instructions in the Handbook, I suggest not specifying the
real mountpoints when using Disk Label Editor.
WARNING: Take extreme care here. Do not work on the wrong drive. That too can really Really Mess Things Up(tm) You will need to partition the disk, label it, then create a new file system by running newfs. Here is my fdisk results: |
|
Testing the redundancy
|
|
Testing is more important than you think. By testing the array now, you know what to expect when a problem occurs. If you don't know what happens when things go wrong, how will you know how to react? My testing plan involves populating the disk array, removing a drive from the array to simulate a failure, and then seeing what happens. Then I will recover from the "failure", and see what happens. I started off by performing the mounts listed below: I shutdown the system, disconnected power from one drive, and restarted the system. All looked well. I had all the files I had before. I could use the filesystem just as before.
I then added a file: It was then that I realized I did not have to wait for it. The rebuild can occur on the fly, so to speak. I rebooted into FreeBSD and left the rebuild to run. Yes, the rebuild can occur in the background, allowing you to use the array. Note: should another drive fail during the rebuild, you will have a useless array. |
|
Drive order
|
|
One concern I had early on with multiple disks was did the drive order matter? If I need to remove the drives, do I have to remember what cable they were connected to? If I make a mistake, will I lose my data? I'm happy to report that order does not matter. At least, not with my testing on my Adaptec 2400A. Perhaps with other cards, order does matter. I don't know. I was able to swap drives around from one channel to another and the controller knew what to do with them. I suspect the controller labels the drives in some manner in order to keep track of them. |
|
Failure is not an option
|
|
The following point is very important.
1By RAID, I mean those RAID configurations which permit a disk to fail. Not all RAID allows this. As you noticed in the previous section, when I removed a disk from the array (simulating a disk failure), the filesystem continue to function. I could read files, add files, etc. However, if I had another disk failure, that would render my array useless. It could not be rebuilt. Therefore, it is very important that you detect and act up on failure as soon as possible. You could have a hot-swap or hot-standby option. I have chosen to go with a cold standby. I will keep a spare 80GB drive, same as all the others (just to be safe). It will be available when the first drive fails. Yes, one will fail. It is just a matter of time. Later in this article I will discuss monitoring options and show you the script I use. |
|
Populating the array
|
|
In this section, I will show you how I duplicated everything from the existing filesystem into the new array. I'll use FreeSBIE and good old dd. I let the array completely rebuild after any testing. Then I booted from the FreeSBIE CD. As root, I did the following:
I started off in my home directory, and started creating the mount points: Now I will mount the old filesystem, READONLY to prevent any possibility of accidental destruction. Now I will mount the old filesystem, READONLY to prevent any possibility of accidental destruction. Now I have the old filesystem mounted under OLD and the new filesystem mounted under NEW. This is good. Now it is just a matter of copying everything from one system to the other. First we will copy the root directory: You will note that I am using a method suggested by Dean in response to my Swapping boot drives around article from 1999. Now I will run the same steps for each mount point, taking care to move into the correct directory (i.e mount point) and to specify the correct destination: |
|
Before you boot: adjust /etc/fstab
|
|
Before booting from the new array, you will need to modify NEW/etc/fstab to so the system mounts the new system, not the old system. Here are the entries from my system. # for 3Ware #/dev/twed0s1a / ufs rw 1 1 #/dev/twed0s1b none swap sw 0 0 #/dev/twed0s1e /var ufs rw 2 2 #/dev/twed0s1f /tmp ufs rw 2 2 #/dev/twed0s1g /usr ufs rw 2 2 #/dev/twed0s1h /usr/home ufs rw 2 2 # For Adaptec 2400A /dev/da0s1a / ufs rw 1 1 /dev/da0s1b none swap sw 0 0 /dev/da0s1e /var ufs rw 2 2 /dev/da0s1f /tmp ufs rw 2 2 /dev/da0s1g /usr ufs rw 2 2 /dev/da0s1h /usr/home ufs rw 2 2
As you can see, I have copied and pasted the old entries, commented out the old
entries, and altered the new entries to refer to the new device
( |
|
Before you boot: adjust permissions on /tmp
|
|
After rebooting the first time, I found this problem:
Ouch. Well, that is easily solved. The permissions were incorrect. This is
what However, this is what I found: You can prevent this problem from occurring with your first boot by correcting the situation with the following: Now you should be ready to boot from RAID device. |
|
Booting
|
|
You should now be able to boot into your new system. Make sure you change the boot order in the BIOS so your RAID device is first. After booting, I found this: [dan@polo:~] $ df Filesystem 1K-blocks Used Avail Capacity Mounted on /dev/da0s1a 503966 46956 416694 10% / /dev/da0s1e 1511934 390086 1000894 28% /var /dev/da0s1f 755902 1162 694268 0% /tmp /dev/da0s1g 30241372 5497576 22324488 20% /usr /dev/da0s1h 197010560 9137806 172111910 5% /usr/home procfs 4 4 0 100% /proc If you've been using FreeBSD for a while, then you'll know that the system automatically sends you a security report via email every night. After cloning a drive, you should be prepared for many new entries in this report. Here is one small extract from the report I got:
The above information indicates that the inode number for the file has
changed. This is to be expected given that the files have been copied to a
new location. The first number on the line is the inode number.
From man With advance notice, tt least you won't get as concerned about this as I did when I first saw it. |
|
Got RAID?
|
|
I've said it before, and you're going to hear it again. RAID will not solve all your problems. But it does remove some headaches. You must monitor it to achieve its full benefits. In my next article, I will show you how I created a NetSaint plugin. By using NetSaint and these scripts, you should get plenty of time to replace a dead drive before the array is destroyed. That alone should save you hours of time. Happy RAIDing. |