The FreeBSD Diary |
| (TM) | Providing practical examples since 1998If you buy from Amazon USA, please support us by using this link. |
|
Secure Your Wireless with IPsec
6 December 2004
|
|
This article originally appeared on O'Reilly ONLamp. Wireless access is all the rage. Wireless this, wireless that. It's everywhere. Hot spots are turning up everywhere. Many are free. Many are totally unsecured. There are several in my neighbourhood. I have no idea who is running them, but at least one is wide open. This article will show you one method for locking down your wireless network so that nobody but you can use it. This approach will take you beyond WEP and MAC address filtering, both of which are a good start, but have known exploits. This website already contains a few articles on IPsec. This article expands upon that foundation and demonstrates an easy method for securing your WAP (Wireless Access Point). I will be using FreeBSD 4.10-STABLE for this excursion. Please keep your hand and legs within the vehicle at all times. In case of emergency, please follow the directions of your crew. They know what to do. While writing this article, I have assumed the following
|
|
Why bother with wireless?
|
|
Wireless is practically wide open for anyone with a laptop, a wireless card, and the appropriate set of tools. WEP can be defeated. MAC addresses can be sniffed and spoofed. In short, you need to go to the next level. IPsec. If wireless is so risky, why use it? Convenience. Wireless is convenient. There are no cables to run. Anyone can pop down to the local Future Shop, buy a wireless access point plug it in, turn it, and start surfing the 802.11 information super highway. Does this sound familiar? It should. I did it and I wrote about it. I did the right thing. I filtered by MAC address. I turned on WEP. But then I turned off WEP when I had trouble... Yes, I was vulnerable. But I wasn't compromised. As far as I know... Since writing that article nearly 18 month ago, we have since moved to a new house. I've gone through the same process as last time time. Setting up a new rack. Running some cables through the walls. But this time I convinced myself that I was going to set up a secure wireless network. It took me a few hours, but I finally figured it out. To answer my original question of this section, and to tie it in with my recent move, I use wireless so I don't have to run cables. I want to be able to use the laptop in the living room, the dining room, or on the front step (that said, I'm actually typing this into my Windows XP workstation sitting at my desk in the basement, ssh'd into the new Antec box). But I am working on the wireless, I want to keep people off my private network keep prying eyes away from my communications. I can do that with IPsec. Also in my mind, is my neighbour, I don't know who, but there is a neighbour running a WAP nearby. Totally unsecured. I know how easy it would be for me to use their internet connection. I don't want someone using mine. |
|
What is IPsec?
|
|
IPsec is short for IP security. It is a set of protocols for securely exchanging packets at the IP layer. It is frequently used to implement VPNs. We can use the same approach to secure our wireless network. IPsec makes use of shared secrets to encrypt data. It also uses security policies to decide what types of traffic should be encrypted between what hosts. The configuration items outlined below will be sufficient to get you going. |
|
FreeBSD specific details
|
|
This section outlines some of the details that are specific to IPsec on FreeBSD. Regardless of what operating system you wish to use, you will need an IPsec enabled kernel. Your kernel needs to have IPsec support. To do this, you need to have these directives in your kernel configuration file and then compile a new kernel:
I haven't actually used the features of
NOTE: If you are running 5.x (prior to 5.3-RELEASE), you should use
You can have your IPsec database set up at boot time by adding this directive to
That directive will load your IPsec configuration directives from
|
|
Let's walk first, then run
|
|
I'm a big believer in starting small, and working your way towards your goal. For my testing, I first tried
IPsec over my wired network, then moved it over to the wireless network. You may find this strategy useful too.
It allows you to concentrate on the IPsec portion of the problem, get that working, then concern yourself with any
wireless issues.
After you get the IPsec running properly, you can remove the wire, and start using 802.11 instead.
For this testing, I created a new gateway
and put two NICs into the box. This box does NAT using
Your NAT box will want to do some forwarding of packets. I recommend use of Firewall rules and NAT rules are beyond the scope of this article but those two links should give you a running start. |
|
IPsec encryption - a short introduction
|
|
IPsec can create a point to point tunnel between two hosts. The data will be safe from prying eyes (i.e. it will be encrypted) and the gateway will not accept packets which have been modified, since they won't have an authentic signature (i.e. the data will be secured). IPsec can also be configured to secure traffic between two networks or a network and a gateway. There are other configuration options available, but I am going to concentrate on just network, not point to point. The key point to realize is that IPsec cannot exist on its own. You need to have IPsec at both ends of the communication. You cannot just slap IPsec onto your laptop and expect it to work everywhere you go. This is why I have decided to create a wireless gateway. That gateway is the point through which all my wireless traffic will flow. |
|
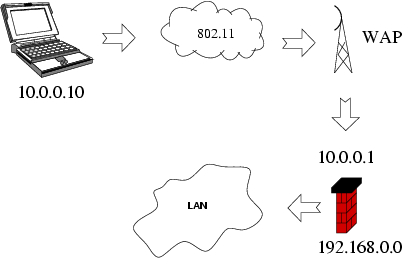
Network diagram
|
|
The following diagram (created with Xfig) illustrates my wireless network. My laptop sits at 10.0.0.10 and communicates over wireless (802.11) to my WAP. The WAP is connected to a dedicated gateway box (via a hub) which sits between the WAP and my LAN.
Any traffic coming in over the wireless network must pass through the WAP and then the wireless gateway. This gateway has two NICs (one at 10.0.0.1 and the other at 192.168.0.55). These are conventional wired NICS. There is no WIFI in this gateway (but there is no reason why there could not be). I have chosen to use a WAP instead. The WAP will be plugged into a HUB, and 10.0.0.1 on the gateway will be plugged into the same HUB. The other NIC will be plugged into the main LAN. |
|
The IPsec database
|
|
IPsec uses a database to decide how to treat traffic. The database contains the rules on what traffic to encrypt, and how to encrypt it. There are two main types of rules: Policy and Association. The Security Policy Database (SPD) determines what traffic should be handled by IPsec. The Security Association Database (SAD) specifies how that traffic should be encrypted.
The main tool for manipulating the database is setkey(8).
I will show you one way to use that tool later. Usually, you place these rules in
You will find rule examples in the next section. |
|
Creating the network tunnel
|
|
These rules ensure that all traffic between the network (10.0.0.0/24) and the gateway (10.0.0.1) is encrypted. We will use ESP (Encapsulating Security Payload) as found in RFC 2406. This ensures that nobody can read your data. rules on the laptopThe first two rules (add) are SAD entries. The next two rules (spdadd) are SPD entries.
The
rules on the gatewayYou will notice that the rules for the gateway are very similar to the laptop rules and also slightly symmetric. You can add these rules manually using control-D. When testing, I actually keep it running and
copy/paste the commands directly. I use these commands to clear out existing database entries
before adding new ones.
The flush command clears out the SAD entries. The spdflush command clears out the SPD entries. In the policy statements (spdadd), the second line above states that all traffic from 10.0.0.0/24 to anywhere requires ESP. The fourth line states that all traffic from anywhere to 10.0.0.0/24 also requires ESP. Combined, these two directives ensure that all traffic from anywhere to anywhere (on this network) must be via ESP. While I was testing these rules, I kept them on a local website. That made it easier to copy/paste the rules from the browser. I'm not suggesting that you publicly publish your rules. This is just a debugging tool. Mind you, the only parts you need to keep secret are the keys (e.g. 1234567890123456).
You can place your rules in When loading the rules, you'll need to coordinate them. I sat at the gateway console with my laptop beside me. That way, if I messed up the rules, I could reset them without moving. The rules provided worked for me. They should work for you too. If they don't, go back to square one and ensure that your rules are correct. Ensure that the subnet and the IP addresses are what they should be. After you implement these rules, all traffic heading towards the gateway which is not ESP, will be rejected. Furthermore, anyone attempting to communicate with the gateway must have the shared secrets. Change the secret, nothing passes the gateway. |
|
Confirming traffic
|
|
By this point, you have IPsec on both machines, and you have set the IPsec database rules. You have traffic flowing. Now you want to confirm, that yes, everything is encapsulated and not in clear text. Here is how I did that. On my wireless gateway, the IP address 10.0.0.1 is assigned to dc0. All traffic from the laptop will be coming in on that NIC. I issued this command to view that traffic: The above is dhclient starting up on the laptop. The following is a bit of arp traffic. If all you see via tcpdump is stuff like this, then you're good to go.
If all you see is You should see what the IPsec traffic looks like. Have a look. Shorten the command above to this: The above tcpdump is of http traffic as my laptop access my development copy of FreshPorts. Here is what a ping looks like: So there you go. All good. Nothing passes through the gateway unless it matches the rules. The shared secret is the key to this security. In the next section, I'll show you how to keep those shared secrets changing so they are much harder to guess. |
|
racoon likes to keep secrets
|
|
Instead of manually changing the shared secrets in your
I installed racoon from the ports tree. I have supplied the configuration files from both my laptop, and the gateway. The only difference between the two files is that I instruct the gateway to listen on only one address (it has two NICs). Here is the diff if you are interested: --- racoon.conf.laptop Wed Sep 15 19:26:03 2004 +++ racoon.conf.gateway Wed Sep 15 19:31:46 2004 @@ -33,6 +33,8 @@ #isakmp 202.249.11.124 [500]; #admin [7002]; # administrative's port by kmpstat. #strict_address; # required all addresses must be bound. + + isakmp 10.0.0.1; } # Specification of default various timer. The configuration file tells racoon the main things it needs to know. One of the items is the pre-shared key file. Look for this directive: From man racoon.conf:# search this file for pre_shared_key with various ID key. path pre_shared_key "/usr/local/etc/racoon/psk.txt" ; Pre-shared key File Pre-shared key file defines a pair of the identifier and the shared secret key which are used at Pre-shared key authentication method in phase 1. The pair in each lines are separated by some number of blanks and/or tab characters like hosts(5). Key can be included any blanks because all of the words after 2nd column are interpreted as a secret key. Lines start with #' are ignored. Keys which start with ' are hexa-decimal strings. Note that the file must be owned by the user ID running racoon(8) (usually the privileged user), and must not be accessi- ble by others.
So here is what is in my
And here is the file from the wireless gateway: MySecretValue.
Similarly, the racoon running on the gateway knows to use the same shared key
when speaking to 10.0.0.10 (my laptop).
To start racoon, issue this command:
But if you're running a recent version of FreeBSD (e.g. 4.10-RELEASE), you'll
also need to have this entry in Ensure that racoon is running on both the laptop and the gateway. Then you can remove the SAD entries from both machines, and racoon should negotiate a new set of keys. If that doesn't work, try running racoon in the foreground (after first stopping the one running in the background):# setkey -c flush; ^D But, it should just work. |
|
Fun with keys - understanding what happens
|
|
I thought it might be interesting to clear out the SAD entries and see what happens when new keys must be negotiated. I started a ping running, and ran tcpdump while I issued this command: As you can see, the ping missed a few steps. That is understable. Two pings went missing. They never reached the machine on the other side of the gateway. Here is some of the tcpdump traffic: The lines which contain isakmp represent the two racoon daemons negotiating a new key.
As an experiment, I turned off IPsec on my laptop, by commenting out the
To get IPsec running again, I did this, while the ping was still running:
The first line populates the SAD,1 database, based upon the data within the
file 1Actually, the command populates only the SAD because the file in question contains only add commands. The spdadd commands have been commented out. |
|
DHCP server
|
|
I mentioned above that I could still get an IP address from my DHCP server that was running on my gateway. I had not previously mentioned this but I think it might be useful to you. Here are the basics. The rest you should be able to piece together yourself. Installing dhcpdTo install the dhcp server, I did this: Starting at boot time
This will install The configuration file
The ports installs
That fixed-address relates to the following entry in
This allows the laptop to tell the DHCP server who it is, and I use that to assign a specific IP address. Note: this method is convenient, but it is not necessarily secure. If you're like me, and sometimes your laptop uses wireless, and sometimes it's connected via wire, then you might want to give it a different IP address depending on where it is. I do that by having two DHCP servers. I'm sure someone will show us another method. |
|
Is that enough?
|
|
Now that you have your wireless laptop connected to your LAN, and the traffic is not only encrypted, it is also secured. Nobody else can use your gateway unless they can guess the secret key. That's not easy. The keys will be changed from time to time, so even if a key is guessed, there's a new one coming along soon. The only thing you have to secure is the pre-shared secret. Don't use what I've supplied. Come up with something odd. Even some random values. Pick some text from IRC. That should work. But are you being paranoid enough? I think for one of my next tasks, I will look for any unusual traffic coming on on the gateway, from any IP other than my laptop. Whole books have been written on intrusion detection, and that topic is well beyond what I can cover here. Enjoy. |