The FreeBSD Diary |
| (TM) | Providing practical examples since 1998If you buy from Amazon USA, please support us by using this link. |
|
Home networks are everywhere
31 March 2003
|
|
[Free]BSD has networking in its roots. It's one of the things it does very well. Why else would the BSD TCP/IP stack be used in so many other operating systems if it wasn't the best around? Most people who use FreeBSD will also have a home network. Whatever the size of your network, it has grown as time passed. It evolved. It might not have been planned out from the start, so the physical environment may not be exactly what you need given the growth. So that is why moving to a new location gives such a great opportunity to create what you need. Even if that need soon changes as your network further evolves.
This article will provide some tips which will help you when setting up your network, designing the rack, running the cable, and configuring your WAP. The photographs below will allow you to judge for yourself how tidy and workable the rack and cabling is. And you'll learn about some nifty little tricks which will make things just that little bit better. |
|
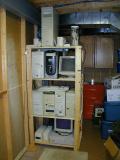
Start with the rack
|
|
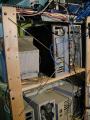
The rack is where all your equipment will go. Ideally, it will have easy access, both front and back. That's why my rack has the side towards the wall, which the opposite to how a bookshelf is aligned. Here's a checklist of items for siting and creating your rack:
|
|
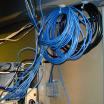
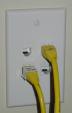
Creating your own cables
|
| I was quite fortunate to have the help of a commercial cable installer for my network. He ran the cables from the rack to the outlying locations. I added the plugs and jacks to the cables. That is easier than it sounds, but you will make mistakes. I also did the tying up of the cable clusters and anchor them to the joists and studs. This was made easy by the use of cable tie anchors. |
|
Cable tie anchors
|
 The actual name on the package is mount pad
but I'll describe them. They are about an inch square, with an adhesive backing, four
holes for screws, and a hole through which a cable tie can be passed. This allows you
to secure the cables so they form a nice neat bundle. See the photos for how these
were used.
The actual name on the package is mount pad
but I'll describe them. They are about an inch square, with an adhesive backing, four
holes for screws, and a hole through which a cable tie can be passed. This allows you
to secure the cables so they form a nice neat bundle. See the photos for how these
were used.
When cutting those cable ties, be sure to cut the excess off completely. Do not leave a sharp protruding edge which can be razor sharp. Invest in some side cutters, easily available from Radio Shack. |
|
Wiring is pretty easy
|
I had never before wired up network cables. And my helper wasn't going to do it for me.
Luckily this is easily mastered and there is abundant documentation for this. A quick
search on Google
provided me with the information I needed. I found these references to be helpful:

As mentioned in the fifth link, you can run two RJ45 jacks or one jack and one or two phones from a single CAT5 cable. The choice is yours but read the last two FAQ from that link before you decide. For what it's worth, I have hooked up a phone line to one of my cat5 cables. One thing to note: you don't have to strip each CAT5 wire. Yes, you have to remove the cable housing (also known as the jacket or protective housing) to reveal the wires inside, but you don't have to strip those wires. That applies whether you are attaching the cable to a jack or to a plug. The crimping tool or punch down tool is designed to work with non-stripped wires. |
|
Home Depot has it all!
|
|
Did I say Home Depot? Yes, I did. Home Depot has CAT5 cable,
phone cable, electrical cable, face places, jacks, connectors, utility boxes, cable ties, and cable
tie anchors. It even has crimping
tools. At least my local Home Depot has it. Mind you, I'm living in Silicon Valley North (otherwise
known as Ottawa). Does your local Home Depot have this stuff? I don't know. But I think it'd make
a nice thread in the user comments for this article. Give them a call. Ask them if they have CAT5 cable.
|
|
Consider a cable tester
|
|
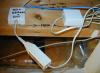
For this project, I bought a LinkMaster cable tester.
With a cable tester, you can instantly prove whether or not
a given cable is good or miswired. My cable tester is two small boxes, each with a jack for an RJ45 plug.
One has lights, one doesn't (that's the remote unit). You plug one end of the cable into each jack, press
a button, and the lights tell you whether or not the cable is good.
I used this unit to test all my existing cables, and I found a few which were broken. So I cut off the plug which was faulty, put on a new plug, and I had a working cable! I also used this to test every one of my new lines throughout the house. I'd plug a known good cable into the remote unit and plug the other end of the cable in the jack. Then I'd take the main testing unit to the rack and plug that end of the cable into the main testing unit. The first cable I tested failed the test. It took me a while to figure out why.... That was the cable I'd run to both a jack and a phone jack... DOH! My opinion: buy a tester. It's well worth it. |
|
The demarcation point
|
|
At my demarcation point, I split the phone line into two parts. One went to my rack, the other went through a filter and then to the rest of the house. The filter is necessary in order to keep the DSL signal away from the house phones. Doing it this way keeps things simple. Of course, if you have only one phone, put the filter into that jack, and plug your phone into the filter. Very simple. |
|
The Wireless Access Point (WAP)
|
|
I've had my wireless cards for at least two years.
I had them long before I got a laptop. But I've always used them in ad hoc mode with
my dual XEON acting as a gateway. Given that I had two cards,
and the new household had two laptops, I thought it would be a good idea to take the
plunge and buy an access point.
The WAP included a wall mount bracket which doubles as a stacking tool. To use the mounting bracket, the rubber feet on the WAP must be removed. I was able to do this by gently pushing some needle nose pliers into the hole in the bottom of the foot, and popping the foot out of the unit. Remember to store the feet somewhere you'll be able to find them. Mine are in a plastic bag, which is thumbnailed to the wall beside the WAP. Best of all, each card just worked. With both FreeBSD and Windows 98, all I had to do was put in the card and it worked. Well, that's not actually true. I did have to install the drivers for Windows 98. But it just worked. For those of you considering wireless cards, I think you should read what Linksys has to say about wireless security. For what it's worth, I have done what they've suggested:
I should mention that my WAP firmware needed to be upgraded to support 802.11b (the older slower cards, as opposed to the newer, faster cards : 802.11g). The upgrade was available on the Linksys site. At the same URL, I found a Log Viewer Utility which accepts the incoming log messages from the WAP (transmitted over the wired LAN) and displays them on your [Windows] workstation. I found this to be a very useful tool. For what it's worth, I also upgraded the firmware in my Orinoco cards. You can get that from Proxim wireless networks. |
|
The DHCP configuration
|
|
I wanted to use DHCP for both laptops and regardless of whether or not they were using the wired NICs or the wireless NICs. We have four NICs here for two laptops. Any one of the four can wind up in either of the laptops. That's why I can't use MAC address for this.
As part of this exercise, I also upgraded my
Here is my
This works well, for my FreeBSD laptop (
The same good words cannot be said for the Windows 98 laptop. I can't get it to work with the above. It always
gets an IP address in the 10.0.0.100-10.0.0.199 range and never the IP address associated with
|