The FreeBSD Diary

The FreeBSD Diary (TM)

Providing practical examples since 1998

If you buy from Amazon USA, please support us by using this link.
[ HOME | TOPICS | INDEX | WEB RESOURCES | BOOKS | CONTRIBUTE | SEARCH | FEEDBACK | FAQ | FORUMS ]
NetSaint - creating a plug-in for RAID monitoring 11 August 2006
Need more help on this topic? Click here
This article has 2 comments
Show me similar articles

This article originally appeared in OnLAMP.

In a previous article I talked about my RAID-5 installation. It has been up and running for a few days now. I'm pleased with the result. However, RAID can fail. When it fails, you need to take action before the next failure. Two failures close together, no matter how rare that may be, will involve a complete reinstall1.

I have been using NetSaint since first writing about it back in 2001. You will notice that NetSaint development has been continued under a new name - Nagios. For me, I continue to use NetSaint. It does what I need.

The monitoring consists of three main components:

  1. NetSaint (which I will assume you have installed and configured). I'm guessing my tools will also work with Nagios.
  2. netsaint_statd - provides remote monitoring of hosts, as patched with my change.
  3. check_adptraid.pl - the plug-in which monitors the RAID status

With these simple tools, you'll be able to monitor your RAID array.

1For my setup at least. I'm sure that you might know of RAID setups that allow for multiple failures, but mine does not.

Monitoring the array

Monitoring the health of your RAID array is vital to the health of your system. Fortunately, Adaptec has a tool for this. It is available within the FreeBSD sysutils/asr-utils port. After installing the port, it took me a while to figure out what to use and how to use it. The problem was compounded by a run-time error which took me down a little tangent before I could get it running. I will show you how to integrate this utility into your NetSaint configuration.

My first few attempts at running the monitoring tool failed with this result:

# /usr/local/sbin/raidutil -L all
Engine connect failed: Open

After some Googling, I found this reference. The problem was shared memory. It seems that with PostgreSQL running, raidutil could not get what it needed.. I hunted around, asked questions, and found a few knobs and switches:

# grep SHM /usr/src/sys/i386/conf/LINT
options         SYSVSHM         # include support for shared memory
options         SHMMAXPGS=1025  # max amount of shared memory pages (4k on i386)
options         SHMALL=1025     # max number of shared memory pages system wide
options         SHMMAX="(SHMMAXPGS*PAGE_SIZE+1)"
options         SHMMIN=2        # min shared memory segment size (bytes)
options         SHMMNI=33       # max number of shared memory identifiers
options         SHMSEG=9        # max shared memory segments per process

These kernel options are also available as sysctl values:

$ sysctl -a | grep shm
kern.ipc.shmmax: 33554432
kern.ipc.shmmin: 1
kern.ipc.shmmni: 192
kern.ipc.shmseg: 128
kern.ipc.shmall: 8192
kern.ipc.shm_use_phys: 0
kern.ipc.shm_allow_removed: 0

I stared playing with kern.ipc.shmmax but failed to get anything useful. I went up to some very large values. I suspect someone will suggest appropriate values. I found the solution by modifying the number of PostgreSQL connections. I modified /usr/local/pgsql/data/postgresql.conf and reduced the value of max_connections from 40 to 30. Issuing the following command invoked the changes by restarting the PostgreSQL postmaster:

kill -HUP `cat /usr/local/pgsql/data/postmaster.pid`

Now that raidutil is able to run, here is what the output looks like:

$ sudo raidutil -L all
RAIDUTIL  Version: 3.04  Date: 9/27/2000  FreeBSD CLI Configuration Utility
Adaptec ENGINE  Version: 3.04  Date: 9/27/2000  Adaptec FreeBSD SCSI Engine

#  b0 b1 b2  Controller     Cache  FW    NVRAM     Serial     Status
---------------------------------------------------------------------------
d0 -- -- --  ADAP2400A      16MB   3A0L  CHNL 1.1  BF0B111Z0B4Optimal

Physical View
Address    Type              Manufacturer/Model         Capacity  Status
---------------------------------------------------------------------------
d0b0t0d0   Disk Drive (DASD) ST380011 A                 76319MB   Optimal
d0b1t0d0   Disk Drive (DASD) ST380011 A                 76319MB   Optimal
d0b2t0d0   Disk Drive (DASD) ST380011 A                 76319MB   Replaced Drive
d0b3t0d0   Disk Drive (DASD) ST380011 A                 76319MB   Optimal

Logical View
Address       Type              Manufacturer/Model      Capacity  Status
---------------------------------------------------------------------------
d0b0t0d0    RAID 5 (Redundant ADAPTEC  RAID-5         228957MB  Reconstruct 94%
d0b0t0d0    Disk Drive (DASD) ST380011 A              76319MB   Optimal
d0b1t0d0    Disk Drive (DASD) ST380011 A              76319MB   Optimal
d0b2t0d0    Disk Drive (DASD) ST380011 A              76319MB   Replaced Drive
d0b3t0d0    Disk Drive (DASD) ST380011 A              76319MB   Optimal


Address    Max Speed  Actual Rate / Width
---------------------------------------------------------------------------
d0b0t0d0   50 MHz     100 MB/sec    wide
d0b1t0d0   50 MHz     100 MB/sec    wide
d0b2t0d0   50 MHz     100 MB/sec    wide
d0b3t0d0   10 MHz     100 MB/sec    wide

Address    Manufacturer/Model        Write Cache Mode (HBA/Device)
---------------------------------------------------------------------------
d0b0t0d0  ADAPTEC  RAID-5           Write Back / --
d0b0t0d0  ST380011 A                -- / Write Back
d0b1t0d0  ST380011 A                -- / Write Back
d0b2t0d0  ST380011 A                -- / Write Back
d0b3t0d0  ST380011 A                -- / Write Back

#  Controller     Cache  FW    NVRAM     BIOS   SMOR      Serial
---------------------------------------------------------------------------
d0 ADAP2400A      16MB   3A0L  CHNL 1.1  1.62   1.12/79I  BF0B111Z0B4

#  Controller      Status     Voltage  Current  Full Cap  Rem Cap  Rem Time
---------------------------------------------------------------------------
d0 ADAP2400A       No battery

Address    Manufacturer/Model        FW          Serial        123456789012
---------------------------------------------------------------------------
d0b0t0d0   ST380011 A                3.06 1ABW6AY1             -X-XX--X-O--
d0b1t0d0   ST380011 A                3.06 1ABEYH4P             -X-XX--X-O--
d0b2t0d0   ST380011 A                3.06 1ABRWK0E             -X-XX--X-O--
d0b3t0d0   ST380011 A                3.06 1ABRDS5E             -X-XX--X-O--

Capabilities Map:  Column 1 = Soft Reset
                   Column 2 = Cmd Queuing
                   Column 3 = Linked Cmds
                   Column 4 = Synchronous
                   Column 5 = Wide 16
                   Column 6 = Wide 32
                   Column 7 = Relative Addr
                   Column 8 = SCSI II
                   Column 9 = S.M.A.R.T.
                   Column 0 = SCAM
                   Column 1 = SCSI-3
                   Column 2 = SAF-TE
   X = Capability Exists, - = Capability does not exist, O = Not Supported

The output shows:

  • I'm using an Adaptec 2400A (ADAP2400A)
  • I have four drives, all ST380011 and 80MB (76319MB).
  • I'm running RAID-5 giving me 228957MB of space.
  • The array is rebuilding and is 98% through the reconstruction.
  • The drive on Channel 0 (d0b2t0d0) was replaced

It is a subset of this information which we will use to determine whether or not all is well with the RAID array. Our next task will be experimentation to determine what raidutil reports when the array is in different states.

Note: d0b2t0d0 was not actually replaced as the output above indicates. As part of my RAID testing, I had shutdown the system, disconnected the power to one drive, started the system, verified that it still ran, shutdown again, reconnected the drive, powered up again, and started to rebuild the array.

Know your RAID

I'm sure that each RAID utility will have different responses to different situation. I am about to investigate what raidutil reports about my Adaptec 2400A. I will do that by disconnecting a drive from the array, booting, and then building the array. The conditions reported will allow us to customize our scripts.

Normal

Here is what raidutil reports when all is well:

# /usr/local/bin/raidutil -L logical
Address    Type              Manufacturer/Model         Capacity  Status
---------------------------------------------------------------------------
d0b0t0d0   RAID 5 (Redundant ADAPTEC  RAID-5            228957MB  Optimal

Degraded

I shutdown the system, removed the power from one drive, then rebooted. Here is what raidutil reports then:

# /usr/local/bin/raidutil -L logical
Address    Type              Manufacturer/Model         Capacity  Status
---------------------------------------------------------------------------
d0b0t0d0   RAID 5 (Redundant ADAPTE  RAID-5            228957MB  Degraded

This is the normal situation when a disk has died, or in this case, been removed from the array.

After I add the disk back in, raidutil will report the same status. To recover the array, we must rebuild.

Reconstruction

You can also use raidutil to start the rebuilding process. This will sync up the degraded drive with the rest of the array. This can be a lengthy process, but it is vital.

The rebuilding can be started with this command:

/usr/local/bin/raidutil -a rebuild d0 d0b0t0d0

Where d0b0t0d0 is the address supplied in the above raidutil output.

After rebuilding has started, this is what raidutil reports:

# /usr/local/bin/raidutil -L logical
Address    Type              Manufacturer/Model         Capacity  Status
---------------------------------------------------------------------------
d0b0t0d0   RAID 5 (Redundant ADAPTE  RAID-5            228957MB  Reconstruct 0%

The percentage will slowly creep up until all disks are resynced.

Using netsaint_statd

The scripts supplied with netsaint_statd can be divided into two types:

  • scripts that get information from a remote machine
  • a daemon that processes incoming requests and supplies the information
The daemon is netsaint_statd. It should be installed on every machine you wish to monitor. I downloaded the netsaint_statd tarball and untar'd it to the directory /usr/local/libexec/netsaint/netsaint_statd on my RAID machine. Strictly speaking, the check_*.pl scripts do not need to be on the RAID machine, only the netsaint_statd. You can remove them if you want. I have them only on the NetSaint machine.

I use the following script to start it up at boot time:

$ less /usr/local/etc/rc.d/netsaint_statd.sh
#!/bin/sh
case "$1" in
    start)
        /usr/local/libexec/netsaint/netsaint_statd/netsaint_statd
        ;;
esac
exit 0
Then I started up the script:
# /usr/local/etc/rc.d/netsaint_statd.sh start

The RAID machine now has the netsaint_statd script running as a daemon waiting for incoming requests. Now we will move our attention to the NetSaint machine.

This post by RevDigger is the basis for what I did to set up netsaint_statd.

I installed the netsaint_statd tarball into the same directory on the NetSaint machine. You will need the check_*.pl scripts this time.

Now that NetSaint has the tools, you need to tell it about them. I added this to the end of my /usr/local/etc/netsaint/commands.cfg file:

# netsaint_statd remote commands
command[check_rload]=$USER1$/netsaint_statd/check_load.pl $HOSTADDRESS$ $ARG1$ $ARG2$ $ARG3$ command[check_rprocs]=$USER1$/netsaint_statd/check_procs.pl $HOSTADDRESS$ $ARG1$ $ARG2$ $ARG3$ $ARG4$ command[check_rusers]=$USER1$/netsaint_statd/check_users.pl $HOSTADDRESS$ $ARG1$ $ARG2$ $ARG3$ command[check_rdisk]=$USER1$/netsaint_statd/check_disk.pl $HOSTADDRESS$ $ARG1$ $ARG2$ $ARG3$ $ARG4$ command[check_rall_disks]=$USER1$/netsaint_statd/check_all_disks.pl $HOSTADDRESS$ $ARG1$ $ARG2$ $ARG3$ $ARG4$ command[check_adptraid.pl]=$USER1$/netsaint_statd/check_adptraid.pl $HOSTADDRESS$ $ARG1$ $ARG2$ $ARG3$ $ARG4$

Here are the entries I added to /usr/local/etc/netsaint/hosts.cfg to add monitoring for the machine named polo. Specifically, we will be monitoring load, number of processes, number of users, and disk space.

service[polo]=LOAD;0;24x7;3;2;1;freebsd-admins;120;24x7;1;1;1;;check_rload! 3
service[polo]=PROCS;0;24x7;3;2;1;freebsd-admins;120;24x7;1;1;1;;check_rprocs!
service[polo]=USERS;0;24x7;3;2;1;freebsd-admins;120;24x7;1;1;1;;check_rusers! 4
service[polo]=DISKSALL;0;24x7;3;2;1;freebsd-admins;120;24x7;1;1;1;;check_rall_disks

Then I restarted Netsaint:

/usr/local/etc/rc.d/netsaint.sh restart
After the restart, the I started to see those services in my NetSaint website. This is great!
RAID Notification overview

To get NetSaint to monitor my RAID array was not as simple as getting NetSaint to monitor a regular disk. I was already using netsaint_statd to monitor remote machines. I have them all set up so I can see load, process count, users, and diskspace usage. I will extend netsaint_statd to monitor RAID status.

This additional feature will involved several distinct steps:

  1. Create a perl script for use by netsaint_statd to monitor the RAID
  2. Extend netsaint_statd to use that script
  3. Add RAID to the services monitored by NetSaint

RAID Perl script

As the basis for the perl script, I used check_users.pl as supplied with netsaint_statd and I created check_adptraid.pl. I installed that script into the same directory as all the other netsaint_statd scripts (/usr/local/libexec/netsaint/netsaint_statd/netsaint_statd.

If you look at this script, you'll see that we're looking for the 3 major status values:

if ($servanswer =~ m%^Reconstruct%) {
	$state  = "WARNING";
	$answer = $servanswer;
} else {
	if ($servanswer =~ m%^Degraded%) {
		$state  = "CRITICAL";
		$answer = $servanswer;
	} else {
		if ($servanswer =~ m%^Optimal%) {
			$state  = "OK";
			$answer = $servanswer;
		} else {
			$answer = $servanswer;
			$state = "CRITICAL";
		}
	}
}

I have decided that Degraded and unknown results will be CRITICAL, Optimal will be OK, and that Reconstruction will be a WARNING.

The next step is to modify netsaint_statd to use this newly added script.

netsaint_statd patch

The patch for netsaint_statd is available from here. Apply the patch like this:

cd /usr/local/libexec/netsaint/netsaint_statd
patch < path.to.patch.you.downloaded
Now that you have modified the daemon, you need to kill it and restart it:
# ps auwx | grep netsaint_statd
root 28778 0.0 0.5 3052 2460 ?? Ss 6:56PM 0:00.32 /usr/bin/perl 
                /usr/local/libexec/netsaint/netsaint_statd/netsaint_statd
# kill -TERM 28778
# /usr/local/etc/rc.d/netsaint_statd.sh start
#

Add RAID to the services monitored by NetSaint

Now we have the remote RAID box ready to tell us all about the RAID status. Now it's time to test it.

# cd /usr/local/libexec/netsaint/netsaint_statd
# perl check_adptraid.pl polo
Reconstruct 85%

That looks right to me! Now I'll show you what I added to NetSaint to use this new tool.

First, I'll add the service definition to /usr/local/etc/netsaint/hosts.cfg:

service[polo]=RAID;0;24x7;3;2;1;raid-admins;120;24x7;1;1;1;;check_adptraid.pl

I have set up a new notification_group (raid-admins) because I want to be notified via text message to my cellphone when the RAID array has a problem.

The contact group I created was:

contactgroup[raid-admins]=RAID Administrators;danphone,dan

In this case, I want contacts danphone and dan to be notified.

Here are the contacts which relate to the above contact group (the lines below may be wrapped, but in NetSaint there should only be two lines):

contact[dan]=Dan Langille;24x7;24x7;1;1;0;1;1;0;notify-by-email;host-notify-by-email;dan;
contact[danphone]=Dan Langille;24x7;24x7;1;1;0;1;1;0;notify-xtrashort;notify-xtrashort;dan;6135551212@pcs.example.com;

This shows that I will be emailed and an email will be sent to my cellphone.

After restarting NetSaint, I was able to see this on my webpage:

netsaint warning

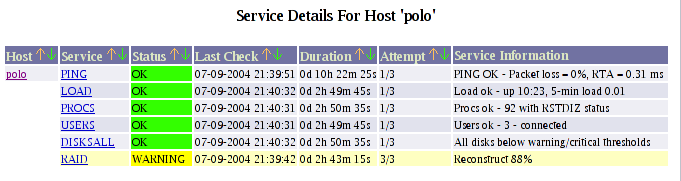
If your RAID is really important to you, then you will definitely want to test the notification via cellphone. I did. I know it works. But I hope it never has to be used.

Got monitor?

I've said it before, and you're going to hear it again. RAID must be monitored if you are to achieve the full benefits of it. By using NetSaint and the above scripts, you should get plenty of time to replace a dead drive before the array is destroyed. That notification alone could save you several hours.

Happy RAIDing.


Need more help on this topic? Click here
This article has 2 comments
Show me similar articles